How to Make Fruit Vinegar at Home
Have you ever thought about learning how to make vinegar from scratch? The process is simple and the end result is tasty and unique. Almost anyone can learn! In this post, I'm going to show you how to create delicious, fermented fruit vinegar in your own kitchen!
Here's how the process works!

How to Make Vinegar From Scratch
In order to create fruit vinegar, you need 1) fruit juice, 2) natural yeast and 3) acetic acid bacteria. The last two are naturally found in the air, so your job is to source 100% pure fruit juice!
Step 1: Source Your Fruit
If you live in fruit country and have access to a U-pick, or if you raise your own fruits and berries, the first step is easy! All you have to do is harvest your fruit!
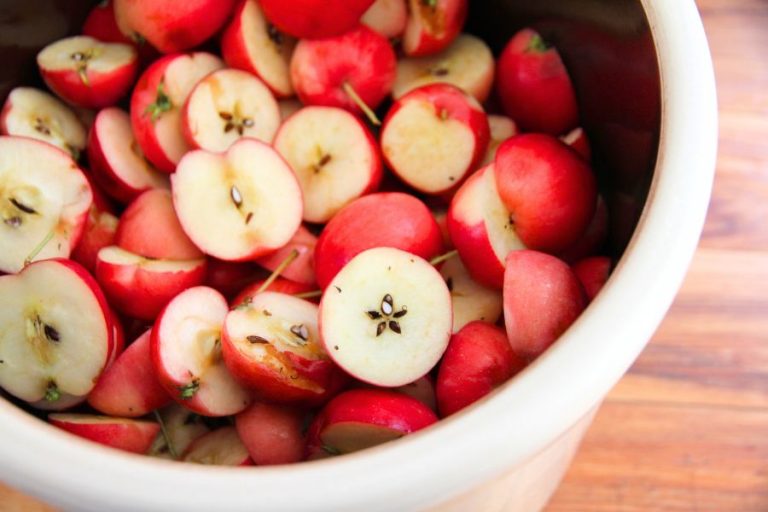
Whether you're working with berries, stone fruits, grapes or members of the apple family, always pick fruit at the peak of ripeness.
Remove stems, debris and leaves. Firmer fruits can be give a quick rinse, while soft fruits (like raspberries) should be picked over by hand.
This accomplished, it’s time to create your juice!
Step 2: Extract Juice from the Fruit
There are numerous ways to extract juice from your fruit, and methods vary according to fruit type. I go over all these techniques in my e-book on making fruit vinegar. For the sake of keeping things simple, I’ll give you one of the easiest methods today, one suitable for soft berries and grapes.
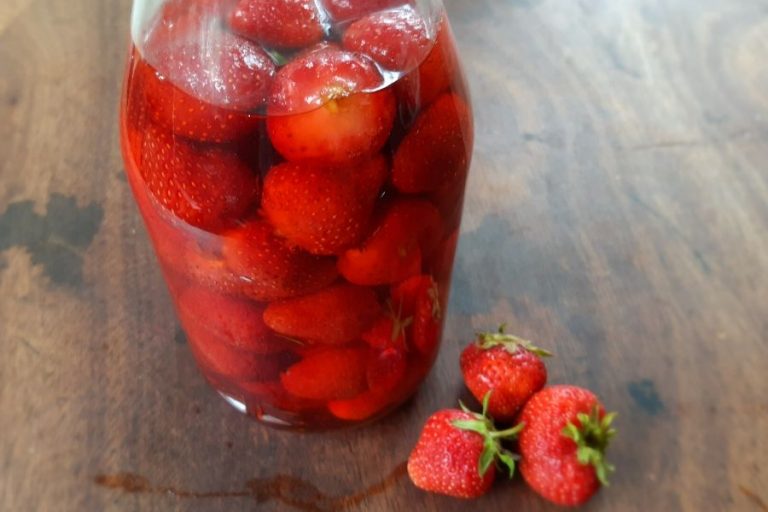
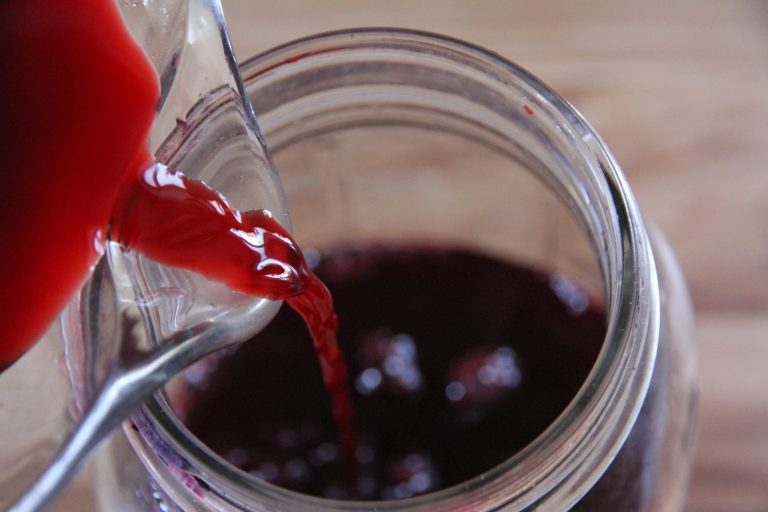
Line a large bowl with a cotton cloth. I like to use these ones here, but any type of cotton will do! Pour the berries into your cloth-lined bowl and grab an old fashioned potato masher. Vigorously break up the fruit, until it becomes a thick, mushy mess. Gather up the 4 corners of your cotton cloth, tie them together and hang your homemade cloth bag so it drips into the bowl below.

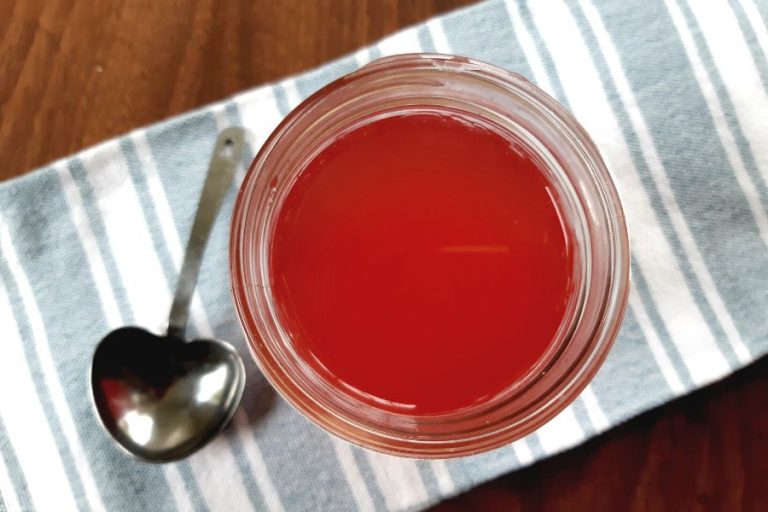
When the dripping stops, you’ll have a beautiful collection of raw, extracted berry juice, ready for fermentation!
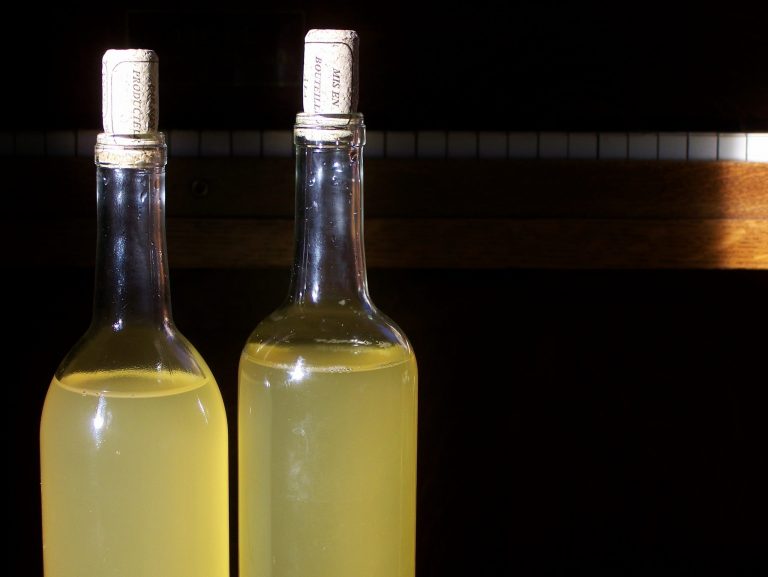
Step 3: Pour Juice into a Food-Safe Container
You’ll want to use a food-grade container to hold and ferment your juice in. It could be a wide mouth glass jar, stoneware crock or a (food grade) plastic bucket. For berry vinegar, I prefer to use a 2 quart/2litre glass jar. To keep dust bugs at bay, you’ll want to cover the mouth of your container with a cloth or paper towel. It should be tied down with a string, elastic or canning band.
Why can’t you use a lid?
There are two reasons you shouldn’t use a lid: fruit flies and acetic acid bacteria. Let’s talk about fruit flies first.
Fruit flies will be drawn to the smell of your fermenting fruit juice. And they’re capable of creeping through the tiniest spaces. If your lid isn’t a perfect fit, you’ll soon find hundreds of tiny, white maggots swimming in your fruit juice.

The other reason is this: if your ferment is sealed off without airflow, airborne acetic acid bacteria won’t be able to flourish and grow. Let me explain how it works!
Step 4: How the Fermenting Process Works
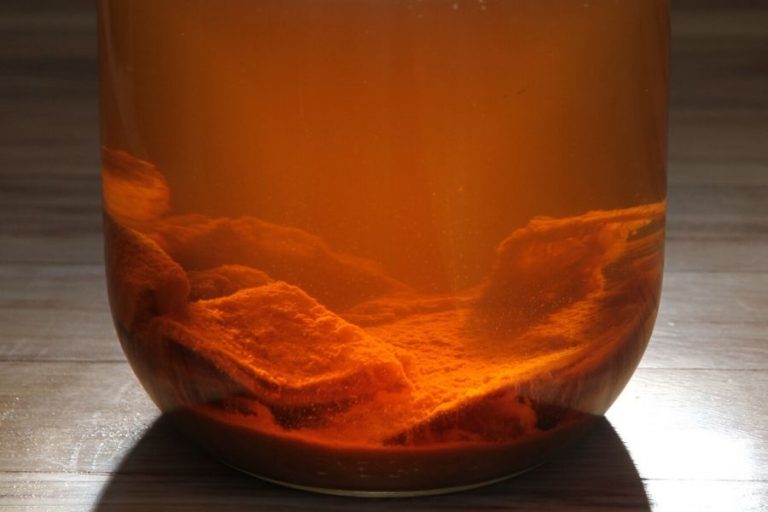
The first stage of fermentation is a result of natural yeasts. These yeasts are airborne and can also be found on the skin of your fruit. It’s likely they are already present in your juice!
As your juice sits in a warm room (60-80F or 15-26C), these yeasts will become active and feed on the juice’s natural sugars. As they feed, they convert sugars to alcohol, releasing carbon dioxide. If you see bubbles on the surface of your liquid or the sides of your container, it’s a sure sign natural yeasts are in action!
This first phase of fermentation is called the “alcohol” phase. Because of, you know, the alcohol.
But it doesn’t stop there. While these natural yeasts are busy consuming and converting the sugars to alcohol, an air-borne bacteria slips in to do its job. That’s right! This is why you can’t cover your fruit juice with a lid! If you seal it up, it will remain in alcohol form.
The air-borne bacteria takes the alcohol produced by the natural yeasts and slowly, converts the alcohol to acetic acid. That’s right! The very thing that makes vinegar what it is!
Step 5: The Length of the Fermenting Process
If you are fermenting no more than 2 quarts (1.5 litres) of berry juice, the first stage of fermentation will take anywhere from 3-4 weeks, a time during which your ferment will omit a light alcohol-like aroma.
Not so with the second stage! When acetic acid bacteria arrive on the scene, you’ll notice a distinct, pungent, vinegar-like aroma wafting up from the liquid. This aroma will continue to grow, until all the alcohol has been consumed!
And when it has? You’ll have nothing but a pure, raw fruit vinegar, ready to be put to use in the kitchen!

Step 6: Finishing Off Your Fruit Vinegar
Now that you've learned how to make vinegar from scratch, there are few things you need to be aware of when storing and keeping your fermented fruit juice!
Tip 1: Use Safe Storage Containers
When the time comes to bottle your finished vinegar, make certain you use food grade containers. Also see to it that your lids aren’t made of metal. Due to it's acidic nature, vinegar can be corrosive and will eventually rust out metal lids, dripping unwanted metals into your fermented goodness!
If you are storing your vinegar in glass jars, I recommend using these white, wide mouth plastic lids.
In my home, I prefer to use glass bottles for smaller batches and glass gallon jugs for storing large amounts of vinegar. For lids, I like to use corks. They add an old-world feel to my kitchen. Plus, they’re eco-friendly, pretty and can be reused over and over again!

But wait. Before you go, we have to talk about testing your vinegar before sealing it up!
Tip 2: How to Test Vinegar Before Sealing It Up
It can be difficult to tell exactly when the bacteria has transformed all sugars to acetic acid. As a result, you’ll want to display caution when it comes to sealing up your “finished” vinegar. You see, if it isn’t actually finished, it will still release small amounts of carbon dioxide. If you seal that up, the results can be explosive!
The best way to tell whether or not your vinegar is ready to be sealed up is to seal it up! That’s right! Put it under tight seal and then check it in 1-2 day's time. Was there a release of carbon dioxide? If so, you know it’s not ready quite yet. Let it sit for another 14 days, then try sealing it up again.
Don’t tuck it away in your cupboard just yet! If there wasn’t a release after day 1, seal it back up and let your fruit vinegar sit for 2-3 days at room temperature. No release? It’s ready to be tucked away in a cupboard for when you do need it!
Wrapping Up...
Now you know how to make vinegar from scratch! I wish I had space to give you troubleshooting tips, recipes and hand you more details on how to use fruit vinegar in the home. But I’m afraid this post is too long already!
If you want to learn more, be sure to check out my e-book "Fruit Vinegar for Beginners." It's jam-packed with information and contains far more detail than I could fit in one single blog post!
All the best as you venture into the world of traditional fruit vinegar! And if you have questions, don't hesitate to ask in the comments below!

Thank you so much for the awesome guidelines. Is there any fruit you cannot make vinegar from?
I haven't tried banana or other dry, starchy fruits. I have no idea if they would work or not! Extracting sugars is the important thing. 🙂
Thank you for sharing this ❤️ What glass jugs with corks do you use?
I list all the supplies I use here: Vinegar Making Supplies
Thank you for your information on making vinegar. I used a recipe from Kirsten Shockey's book on Vinegar using bananas. I followed the directions and stirred for about 5 days. After that, I took off all the pulp and put the liquid in a bottle. Well, the liquid would continue to ferment and I had to open the top of the bottle a couple of times a day to let the air or gas out. I decided to put the liquid back into a mason jar like before. I continue to take the pulp off as it settles on the top. I have stirred it and hope I can finally get all the pulp out. Now the liquid has turned orange. I am afraid to use it. When I first bottled it, the ph was a little over 3. I can't figure out what is happening and why I keep having scum on the top. I even put the liquid through cheesecloth one time, hoping to clean it from the pulp. What happened to my vinegar?
Hi Susan.
I'm sorry I can't help, but I've never heard of making vinegar with bananas. All I can say is that if you're in doubt, throw it out. Sorry I couldn't be more help!
This produces a mother, correct? I've been looking online for how to make one truly from scratch and every site talks about adding vinegar to the fruit juice.
Sometimes it does produce a mother culture, but not always. And yes, if you have some real apple cider vinegar on hand, you can add some to the fruit juice. But it isn't necessary to do so. 🙂 I have a full tutorial on how to make apple cider vinegar: https://atraditionallife.com/how-to-make-homemade-crab-apple-cider-vinegar/
The tutorial is for crab apples, but the process is the same regardless of the apple type. 🙂
This blog post is just what I’ve been looking for! Can I make vinegar with prickly pear fruit? The juice is a gorgeous red color.
Hi Rachelle!
I don't know if it would work or not. It all depends on the sugar content of the prickly pear fruit. Is it sweet, like a fruit juice? Sugars are essential to the fermenting process. If not, you could try and add about 1-2 tablespoons of sugar or honey to every 4 C of liquid. This would give yeasts enough sugars to feed on and start the vinegar fermenting process. Let me know if you try and also, how it goes!
I think sugar content depends on individual fruit. I will give it a try and let you know how it goes (and how much sugar, if any, I use). Thanks so much!
Absolutely! Best wishes with your project!
Hi I have an allotment and was wondering if you could make vinegar from gooseberries as I have a few bushes that are hanging with them in the hundreds Any advice would help. Thanks.
Yes, you can! Just make sure they're fully ripe and I would recommend using an extracting method that requires heating your berries (such as steam juicing or doing a stockpot extraction). I give more details in my book on making vinegar: https://atraditionallife.com/product/fruitvinegar/
Does light affect the process? Should I keep it away from sunlight or artificial light while it ferments? Thanks.
I never keep my juice out of the light when I ferment it. But you can! I don't think it will matter too much, either way!
Thanks!
I ordered your e-book tonight. It seems very interesting and really easy to understand. I now have a renewed interest in making vinegars. Thank you. I have an elderberry vinegar that I started on August 24. Just juice from steam juicing. I did notice a few bubbles early, but not like what I see when my wine ferments. Now, weeks later (and one new grandbaby later), I notice that it smells like vnegar. I tasted it and yes, I think it tastes like vinegar. I put a tight lid on about a cup of it, and I'll check in a few days if it is building pressure. I think I'm curious if I could really have vinegar after only about 7 weeks. I was working with only about 3 cups of juice, so not a lot. Maybe that helps speed things up???
Congrats! Yes, smaller amounts of juice will ferment much quicker because there are less sugars for yeasts to consume. As a result, there's less alcohol for acetic acid bacteria to convert. Let me know if you have any questions!
Thank you so much!!!
I saw this when you were on Melissa K. Norris' blog. This method fascinated me. I started Elderberry juice 3 days ago and now I see some spots of fuzzy mold. So sad. I also see bubbles starting. I'm thinking I need to scrap this because of the mold, right?? I extracted juice with my steam juicer and covered it with a coffee filter.
Hi Mary Ellen!
Yes, skim the white mold off. And then (because of mold), I'd recommend covering the jar with a tight fitting lid. Break the seal every day and once the juice has moved thru the alcohol phase, cover the jar with a breathable cover to finish its fementing phase. Also make sure your home temps arent above 80-85F. Sometimes this can contribute to mold. Good luck and feel free to email me if you have more questions!
Hi Autumn! I have a batch of plum and a batch of sea berry vinegars on the go - on the plum I am getting mold - every few days? It’s sitting on my kitchen counter - good air circulation - covered with cheesecloth? My sea berry seems to have quite a bit of sediment? Do you just leave that in there for now?? They have been going for about 4 weeks now. Thanks!!
It's hard to troubleshoot when I don't know which techniques you used to extract the juice? If you're getting mold, I assume you still have fruit pieces in your jars?
If so, fruit should have been removed after 7-10 days.
If that's not the case, your sugar content may have been too low or else your home may have lots of mold spores. Next time, try using a lid for the first 7-10 days, until the proper yeasts take over. I give you lots more trouble shooting details in my book as well.
Sediment is normal. After your liquid turns into vinegar, you can siphon off the clear stuff (I also cover this in my book).
Good luck!
Thank you for this article. I have been making homemade vinegars (or attempting to) by using fruit scraps or mashed whole berries, grapes, and plums with water. A small amount of sugar is added to jump start the process, which I understand is consumed by the bacteria. My success rate has been less than splendid - about 50%. Sometimes they mold, if I neglect the twice-daily stirring, and sometimes they taste "off." I never thought to use juice! Does it need to be fresh, raw juice or can I use my steamer-juicer to extract the juice for vinegar-making?
We have about a dozen very old apple trees and many plum trees. Blackberries grow wild along one side of our garden and blue elderberries are just a short drive up the road, so I have a LOT of fruit to work with in the summer and fall.
We live on a 3+ acre rural homestead in southern Oregon, USA and raise chickens for eggs, have a pair Mallard ducks and a pair of French Toulouse geese, and a few rabbits, along with a starter herd of painted Desert sheep. I think you and I would get along just fine! Our kids are now grown and starting adult lives of their own, so I am a homemaker/homesteader, too, home full-time for now after working part-time.
I love your blog and website, Autumn. You're giving such incredibly valuable and important information and encouragement. Blessings to you!!!
You can use a steam juicer or any other method of juicing! You can use frozen fruits as well. I've had a very high success rate when using pure juice. If you're interested, I have an e-book that goes in depth on this particular topic.
Sounds like you have a happening place with all your farmyard creatures! So glad you enjoyed my little blog! 🧡 Autumn