How to Make Homemade Raspberry Vinegar
In this tutorial, you'll learn how to make homemade raspberry vinegar with fresh or frozen raspberries, so you can make delicious salad dressings and condiments in your own kitchen!
This particular fermented raspberry vinegar recipe is easy to make and you'll love the flavour.

I first became interested in making my own fruit vinegar when I realized it was the key to creating healthy homemade salad dressings and vinaigrettes.
As a newly married woman with chronic health issues, I was on a mission to clean up my diet and to serve the best at my table. At the time, I was just learning that making things yourself is often the gateway to sourcing the healthiest and most affordable food options.
Store bought dressings were filled with quickly-made vinegar, either canola oil, vegetable oil or seed oils I wasn't supposed to consume. And so? I decided it was time to learn how to make my own vinegar, so I could create delicious raspberry dressing with good oils and quality ingredients.
To date, I've now been making fruit and berry vinegar for nearly a decade. And I took the first step by learning how to make homemade raspberry vinegar!
Health Benefits of Homemade Vinegar
Unlike many fruit vinegars you'll find at the grocery store, traditionally fermented vinegar contains loads of good bacteria! Much like a traditionally fermented wine, raspberry vinegar is a by-product of water, natural fruit sugars, wild yeast. But unlike wine, it also contains acetic acid bacteria.
Good for your gut? You bet!
If you make homemade raspberry vinegar using the method I teach here, you'll be leaving the berries in a raw form. This means you get the benefit of anti-oxidants, vitamins and minerals the berries contain.
If you like keeping a whole food kitchen, homemade vinegar will be a wonderful fit for you!
Tools You'll Need
When it comes to making raspberry vinegar, you don't need special equipment. In fact, if you keep a traditional kitchen, you probably have everything on hand already!
Here's a list of items you'll need.
- half gallon jar
- plastic lid
- stainless steel bowl
- cotton straining cloths
- rubber band for securing cloth cover

Ingredients
The list is short, because you only need 2 ingredients to make homemade raspberry vinegar!
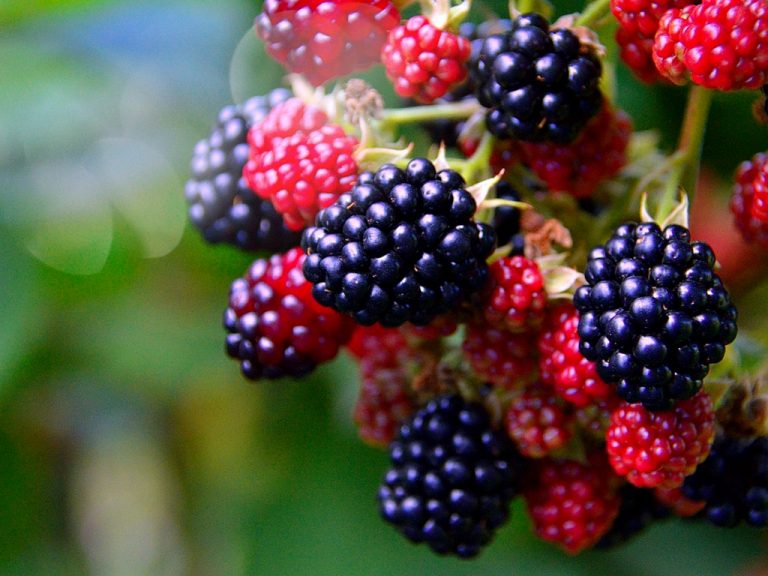
- 4 lbs fresh or frozen raspberries to fill your jar
- filtered water (we use THIS FILTER)
Yes, you can use frozen raspberries for making homemade vinegar. In fact, you'll notice in the photos, I'm actually working with frozen raspberries at this time. 🙂
Watch the Tutorial
How to Make Homemade Raspberry Vinegar
If you've never made traditionally fermented vinegar before, don't worry. This is an easy recipe to follow and the process is simpler than you'd expect! In fact, if you've ever made kombucha before, you're already familiar with much of how it works.
Step 1: Start with 4 lbs Ripe Red Raspberries
To start off, you're going to gather (or buy) your raspberries. I recommend using sun ripened fruit for this project. Home (or locally) grown raspberries usually have higher sugar content, will be fresher and make a stronger ferment.
Meaning you're less likely to have issues during the process!
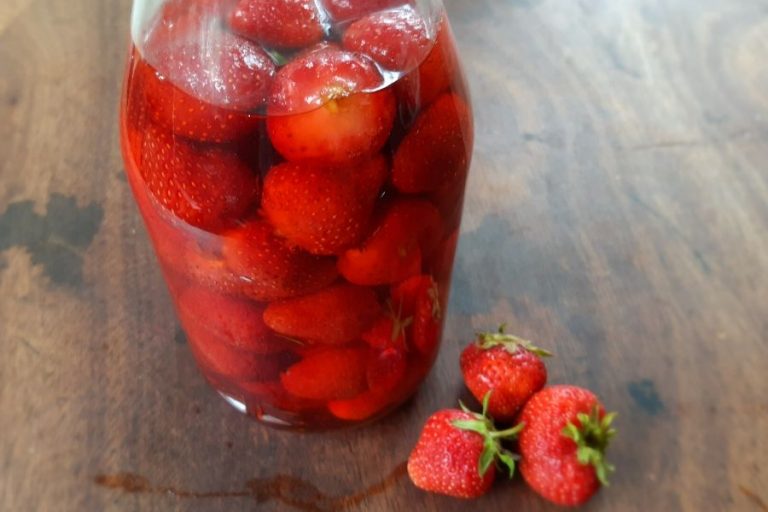
Step 2: Fill Your Jar with Raspberries
Place your raspberries in the jar. They can go in whole, or you can roughly break them up with clean hands or a potato masher. Whatever you do, don't fill the jar to the top! Leave 3-4 inches of open space, so things have room to bubble and expand.

Step 3: Add Water to Your Jar
Add filtered water to your jar until raspberries are just covered. I do recommend using filtered water to ensure there's no chlorine or fluoride to weaken the action of good yeasts and bacteria responsible for creating vinegar.
We use this filter HERE for all our kitchen needs.
Step 4: Cover with a Lid & Infuse
This accomplished, you're going to fasten a lid in place and set the jar on a dinner plate or glass baking dish.
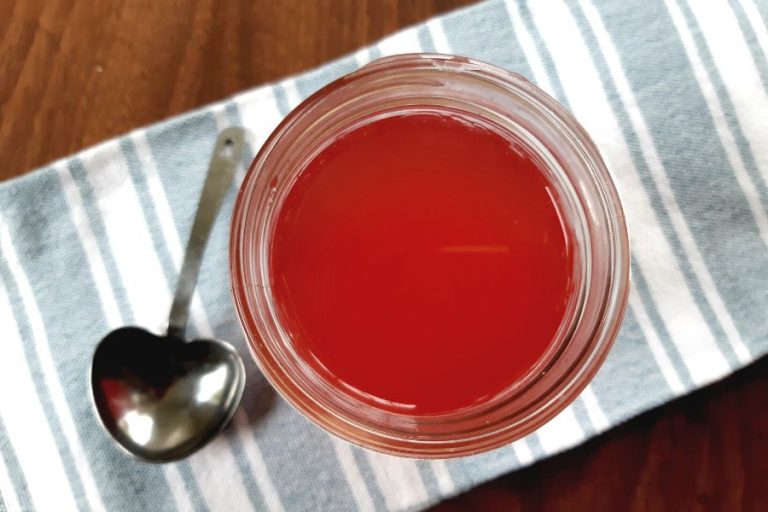
Push it to the back of your kitchen counter and wait for 6-10 days. As they sit, the berries and juices will infuse and the liquid in your jar will change from pale pink to a deep red. Berries will also begin to compress in the top of the jar, leaving pure liquid below.
Throughout this time, you'll want to break the lid's seal every day to release any build up of carbon dioxide that occurs as things begin to ferment.
Does breaking a seal sound like too much trouble? You can pop the jar into the fridge where cold temperatures will prevent natural yeast from going into action, but the berries and water will still infuse over the course of 6-10 days.
Step 5: Identifying Signs of Fermentation
When you first combine raspberries and water, you won't see any action. But by day 4, wild yeasts will likely be actively feeding on the natural sugars in the juice.
You'll start to see tiny bubbles on the surface of your water. You may even see them rising from the bottom of your jar. And you'll definitely notice bubbles being trapped in the berries!
The bubbles are a sign that wild yeasts are at work in your juice, converting the sugar to alcohol. As they feed on the natural sugar found in your raspberries, they release carbon dioxide. And that's what you'll see in the first phase.
As berries infuse with water, they'll rise toward the top of the water and by about day 7, will become compacted in the upper part of your jar.
When your berries have turned to a mushy mass in the upper portion of your jar (usually between day 10-14), you know you've got strong juice. It's time to strain out the raspberries.
Step 6: Strain Out the Raspberries
Line a stainless steel or glass bowl with one of the cotton cloths I linked to above (or grab one HERE). Pour the mushy raspberries and juice into the cloth-lined bowl. Gather up 4 corners of the cloth and knot them together.

Hang your homemade cloth bag where juices can drip into the bowl below.
Leave it for 30-60 minutes, or until the juices stop dripping.
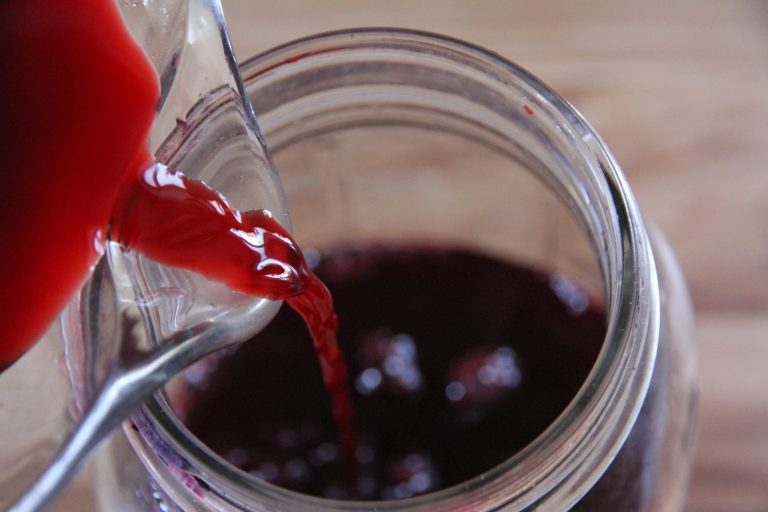
Step 7: Return Juice to Jar and Cover With Breathable Cloth
Rinse your glass mason jar and pour the bright red juice into it. Take a paper towel, square of cloth or even a coffee filter and cover the mouth of your jar, fastening the breathable cover down with a rubber band or string.
Fruit flies love fermented fruit juice and if you want to successfully create a batch of homemade raspberry vinegar, you have to keep them out. If they get in, they'll lay eggs in your juice and it'll soon be fully of wriggly white worms. Please. Don't ask me how I know! 😉
Step 8: Leave Your Raspberry Juice to Ferment at Room Temperature
With a cover that allows airflow to carry bacteria to your juice, the jar can once again be pushed to the back of your kitchen counter, where it will finish the first ferment with wild yeast and soon go into the 2nd stage of fermentation. Only this time, it's an airborne bacteria (instead of yeast) that is going to go into action.
Acetic acid bacteria will take the alcohol produced by wild yeasts transform it into acetic acid.
Yes. That's what makes raspberry vinegar what it is!
This 2nd stage of fermentation will take about 3-5x longer than the first. After about 3-4 weeks have passed, you'll notice a tangy aroma wafting up from your jar. This is a good sign! But you don't want to bottle your vinegar up too soon, just in case wild yeasts are still at work, releasing carbon dioxide.

Step 9: Test Your Vinegar and Store in a Dark Place
I recommend leaving your raspberry juice until you no longer smell a light, alcohol-like aroma and the vinegar tastes very sharp.
To test and see if it's ready for bottling, go ahead and seal about 1/2 cup of vinegar up in a small mason jar with a tight fitting lid. Leave in on your kitchen counter for 4-5 days and then break the seal.
If there was no release of carbon dioxide (recognized by a puff of air) when you loosen the lid, it's ready to be bottled or jarred and stored in a dark place.
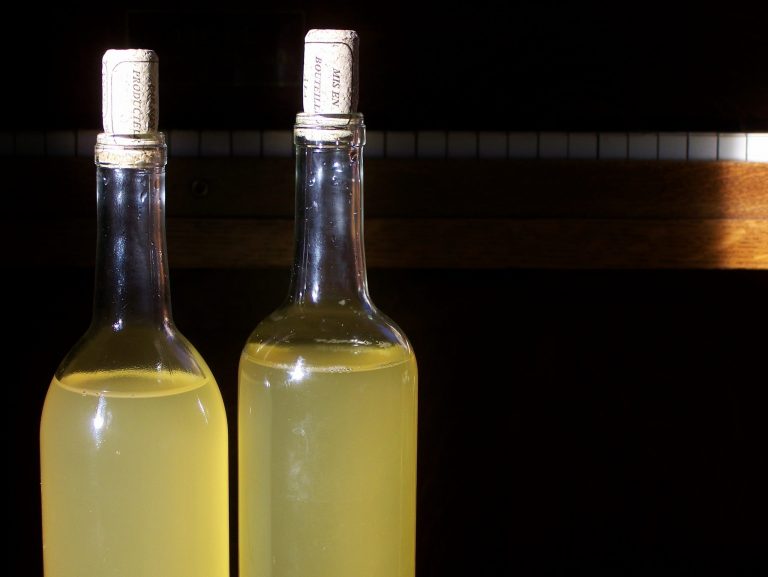
Best Storage Containers for Raspberry Vinegar
Once your vinegar has finished fermenting, I like to transfer it to a storage container that's easy to handle and pour from. Here's a list of my favorites.
- glass wine bottle
- swing top bottle
- glass jug (for storing large batches)
- wide mouth mason jar with a plastic lid
I don't recommend using canning lids and bands for storing homemade fruit vinegar in mason jars. The acetic acid will slowly corrode the white, food grade underside of the lid and rust the tin.

And if vinegar ever drips down to the threads of your jar (like when you pour it out), the acetic acid will rust your canning band when you fasten it down.
How to Store Homemade Raspberry Vinegar
Unlike some folks think, traditionally fermented fruit vinegar (or in this case, raspberry vinegar) doesn't need to be heated or pasteurized to be shelf stable. The acetic acid naturally preserves it at room temperature, so all you have to do is bottle your vinegar and store it in a dark place, or at least out of a direct sunlight.
I also prefer to store my vinegar in a cool place, to keep the acetic acid from mellowing out as quickly. A pantry shelf or cold room is a wonderful place to keep it.
How Long Does Raspberry Vinegar Last?
If stored in an airtight container in a semi cool place, raspberry vinegar will last 12+ months. Over time, the acetic acid will mellow out and eventually, it will lose strength and go mellow. For this reason, most folks like to use it up in a year's time.
FAQ
What is raspberry vinegar make of?
Traditionally fermented raspberry vinegar is made from fresh or frozen raspberries and water. The berries naturally contain the wild yeasts needed for the first phase of fermentation, and the bacteria responsible for the 2nd phase exist all around us in nature and in our homes!
Are yellow raspberries suitable for making vinegar?
I've never tried it, but I'm sure yellow raspberries would create a delicious vinegar as well, as they also would have the sugar content necessary for the fermenting process.
Can I make raspberry vinegar with frozen raspberries?
Yes, absolutely! Thaw the berries ahead of time and then fill your half gallon mason jar (or whatever size you prefer to use), being sure to leave 3-4 inches of open space at the top. Follow the same directions I give in this tutorial.
Does fermented raspberry vinegar develop a mother?
Unlike apple cider vinegar, raspberry may or may not develop a mother culture. Unless you create a very strong vinegar by adding sugar to the raspberry juice, you probably won't end up with a mother culture of the surface of your ferment.
Do I need to add sugar to my fermenting raspberry vinegar?
You do not. But you can! If it seems like the fermenting process is moving very slowly, you can add 1 tablespoon of honey or sugar to the juice. Stir it in and wait a few more days. With the extra food, wild yeasts should increase in action.
How can I increase the acidic flavor in my raspberry vinegar?
If you want very strong vinegar, there are two things you can do to increase the acetic acid content. The first? You can send the liquid through not just one, but several different batches of raspberries! After your first infusion, pour the red juice over a second batch of fruit and later, even a third. This will raise the sugar content and intensify the raspberry flavor.
And the other option? You can add 1-2 tablespoons of sugar or honey to your raspberry juice after you've strained the berries out. This gives the yeast opportunity to create more alcohol, which then means you'll have higher acetic acid levels in your finished raspberry vinegar.

Raspberry Vinegar Recipe Options
There are many different delicious recipes you can create with old fashioned raspberry vinegar! In my digital book, I have an entire section dedicated to fruit vinegar recipes that will draw out the natural flavor of homemade fruit vinegars. You can check it out HERE. Just to wet your appetite, here are some wonderful options for using raspberry vinegar in the kitchen.
- raspberry vinaigrette
- homemade raspberry mayonnaise
- raspberry vinegar dressing
- raspberry haymakers punch
- raspberry marinade for red meat
- garlic infused raspberry vinegar

Homemade Raspberry Vinegar Recipe
Equipment
- 1 half gallon jar (2 litres)
- 4 quart bowl
- cotton straining cloth
- cloth cover
- rubber band
Materials
- 4 pounds ripe raspberries (1814g)
- 6 cups water
Instructions
- Place ripe raspberries in a half gallon jar, filling to the shoulder.
- Cover berries with water, filling also to the jar's shoulder.
- Pop a lid into place and either place the jar on a plate and push to the back of the kitchen counter or place in fridge for the infusion process.
- If left on the kitchen counter, break the seal daily for 6-10 days. Refrigerated? Just let it sit for 6-10 days.
- When the juice is bright red, line a bowl with a cotton cloth.
- Pour the jar's contents into the bowl and knot the 4 corners of the cloth together.
- Hang where juices can drip into the bowl below and leave for about 1 hour.
- Rinse infusing jar and pour raspberry juice back into it.
- Cover the mouth with fabric, paper towel or a coffee filter and fasten down with a rubber band to keep fruit flies out.
- Leave it to ferment for 21-28 days.
- Test for a finish by sealing up some of the vinegar in a small jar with a tight fitting lid. Leave out at room temp for 3-4 days and break the seal. If no puff of air was released, it's ready to be bottled and stored.
- Bottle in a jar with a plastic lid or a jug or bottle with a cork or plastic lid.
- Store in a dark place for up to 1 year.
There is a layer of white something on the top in the second stage within about 3-4 days. Someone on the internet calls it kahm yeast, but there is a lot of it. Will it go away? Is it really OK to leave?
If it's dusty white fuzz, it's likely yeast. It's fine as long as it doesn't start growing blue or green mold. I usually skim mine off, or filter everything through a clean cloth to remove it. 🙂
Thanks for this recipe. I'm in the middle of fermentation now and the liquid looks beautifully red. I'd stirring it daily since I think that will both help prevent spoilage and improve the release of all the carbs in the berries. One thing I don't understand is how it could possibly ferment as quickly in the fridge, at such a lower temperature (since the yeast usually work faster when warmer) and if it is fermenting at the low temperature, why it wouldn't need the carbon dioxide released, since that's still produced if it's fermenting? BTW, be aware that whether chlorine and fluoride is filtered out depends on the filter type you are using.
I think you misunderstood. 🙂 You don't ferment it in the fridge. But you can put it in there for the infusion process. Once the berries and juices have infused, then you can take it out, strain the solids and ferment the liquid like normal. It just help bypass the stirring and such. Hope that clarifies!
Just checked on the 2nd fermentation. It's got a huge blob of blue green mold and a ring around the jar. Is this salvageable?
It may not be if mold has developed that far! But if you do want to try salvaging it, go ahead and skim the mold off the surface with a spoon. Then line a bowl with a cotton cloth and pour the vinegar into it. Lift the cloth to strain any bits out of the vinegar. Pour vinegar into a new, clean jar and wait. If mold reappears in a week or two, it's spoiled and should be thrown out.
I am in the 2nd stage of fermentation and there is a white film on the top of the juice. Is that ok?
A powdery, white film is ok, but I would skim it off so it doesn't give mold (usually blue mold) a chance to grow! 🙂
Will the vinegar damage a rubber seal if the swing top bottle has one?
I've never had it ruin a rubber seal yet! 🙂
Hi,
Can distilled water be used?
Thanks
Yes, of course! Filtered water is best, because it doesn't have chlorine or fluoride to hinder the work of natural yeasts and bacteria. 🙂