How to Make a Simple Kitchen Wreath with Fresh Herbs
Learn how to make a fresh herb wreath with culinary herbs. This simple wreath can easily be turned into a dried herb wreath that will bring country charm to your kitchen all winter long.

I love bringing pieces of our hobby farm and garden into my kitchen. In the summer, it's a basket of eggs and fresh flowers in a vase. In the fall, I like to display home grown pumpkins and bowls of fresh picked apples from a neighbor.
And a few years ago, I learned to take my harvest from the herb garden and create the humble herb swag (see how to make these pretty bundles HERE).
But then I learned how to use my own garden herbs to make fragrant and fresh herbal wreaths! And now they're one of my favourite thing to display in my kitchen.
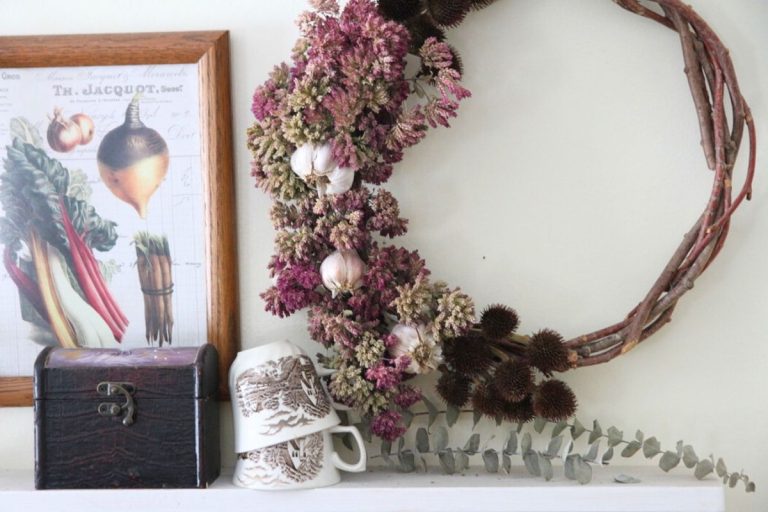
I always make my wreaths on a hand woven, homemade wreath frame. Then I have the option of leaving part of the pretty frame exposed. I teach you how to make your own wreath frame HERE with tree branches.
If you like bringing traditional, old world vibes to your kitchen or want a great gift for someone who loves natural vibes, it's time you learned how to make a simple kitchen wreath with fresh herbs!
Best Type of Herb for Wreath Making
Some herbs are better suited for decorative purposes and especially, for drying on a wreath frame. A general rule of thumb? Herbs with stiffer, woody stems hold their form and shape better than types that wilt and flop.
I've discovered that wilting herb types (such as sage, mint and lemon balm) are best reserved for a fresh herb swag.
You can learn how to make a herb swag HERE.
My favorite herbs are included in the list below, where I share 9 of the best type of herbs for wreath making.
- Bay leaves
- Bergamot (bee balm)
- Hyssop (giant or anise variety)
- Lavender
- Oregano
- Rosemary stems
- Savory
- Tarragon
- Thyme
If you don't already grow your own herbs, I highly recommend you learn. Growing your own is a wonderful way to access fragrant and flavorful herbs at no additional cost to your budget.
Many herbs are perennials and can be incorporated into your landscape or flower gardens.
If you're interested in getting started, I have a free chart that will help you discover which herbs are suitable for your USDA growing season!
And if you aren't interested in growing your own herbs or you want to make a diy herb wreath out of season, you can usually find fresh herbs at your local grocery store.
But a beautiful wreath doesn't stop with herbs. You should also choose and add in a few natural embellishments!
Other Wonderful Additions for a Gorgeous Wreath
There are many things you can add into your culinary wreath for extra colour and texture.
The foliage of some herbs (like parsley or dill) aren't suitable for this project because of their tendency to wilt. But if you let these herbs go to seed, their flowers or seed heads can add a gentle spray of colour to your simple wreath.
You can also use cottage flowers from your own garden for additional colour as well.
I recently discovered I love using echinacea in my homemade herb wreaths. After the petals are spent, I pluck them off and tuck the spiky cone shaped centers between the herb bunches on the wreath frame. They bring a whole new element and create a gorgeous wreath that looks very natural as well.
There are many other additions you can use for embellishment on your wreath frame. As long as the item will hold form and shape, it'll probably be a wonderful option.
Here's a list of common natural choices.
- Dill flowers
- Chili peppers
- Dried fruit clusters
- Garlic bulbs
- Parsley flowers
- Red rose hips
- Small onions
- Sun-dried tomatoes
Items You'll Need for Wreath Making
Because this wreath is all natural and biodegradable, you won't be using a wire wreath form or florist wire. You won't need wire cutters, either! In fact, there's no need to visit your local craft store for this one.
My kitchen decor is usually natural and in most cases, I just use the items I already have on hand or in my own gardens.
To make a beautiful wreath from fresh herbs for your kitchen, you'll need the following items.
- A natural wreath frame (I teach you how to easily make your own wreath bases HERE)
- Pruning shears
- Basket for gathering fresh herbs
- Fresh herbs (of course!)
- Cotton cooking twine
- Large needle (optional)
- Kitchen scissors
Watch the Video Tutorial!
DIY Kitchen Wreath with Fresh Herbs
First of all, you need to decide if you're going to fill the entire wreath frame, or if you want to display part of the beautiful woven wood branches.
Personally, I like partially filled wreath frames. With a beautiful base you can easily make from tree branches (I teach you how to make a simple wreath frame HERE), I think it's worth showing off!
Once you've decided on the style of your wreath, it's time to grab a basket, a pair of pruning shears or scissors and head outdoors.

Start harvesting herbs, taking about 8 inches of stem with each cutting. Pile bundles of herbs in the basket as you go.
On average, it takes about 6 handful-sized bunches of herbs to fill one half of a homemade wreath frame.
Of course, if the herbs are sparse (like thyme or bunches of rosemary), you'll need more. And if they're luscious and full (like oregano blossoms), you'll need less. I like to error on the side of harvesting too much, because I can always dry the extras for cooking!
Once you have enough herbs, bring the basket inside and begin arranging them on your wreath frame. When you're ready, tie down one bundle of herbs.

After you've tightly tied your first bundle into place, form another herb bundle and cover the stems of your first bundle with the foliage of your second bundle. Tie it down. And so on.
If you plan to cover the entire wreath frame, just carry on with this pattern of covering the stems of the previous bundle. And before you know it, the entire wreath frame will be covered.
But if you're like me and want to show off the beautiful wreath frame underneath, you'll need to do a directional change.

You don't want bare stems showing on your wreath. To cover the cut ends, you'll want to lay down 3-5 bundles of herbs on the wood frame.
Cover as much area as you like and then change direction, butting the stem ends of a fresh herb bundle into the stem ends of the last herb bundle you tied down. Make sure these two bundles are very secure.
And then, you can go ahead and tie on embellishments to cover the bare spot where stems meet.
If I plan to use embellishments like garlic, small onions, dried peppers or fruit, I cut a long piece of twine, thread it onto a large needle and "sew" things together in a round cluster. This can be tied on in the bare spot where herb ends butt together.
I hope this doesn't sound confusing, because it really isn't. I have printable directions for your below or you can watch the video tutorial. It's easy once you how the process unfolds.
To hang your wreath frame, tie a short length of cotton twine to the back of the frame. Knot the end of the string to make a hanging loop so you can securely hang your wreath.
Where to Display Your DIY Herb Wreath
Need a great idea (or two, or three?) on where to hang your wreath?
You can display your wreath on a kitchen wall, cupboard door, a kitchen door or just above a small wall shelf in your home.
If you want it dry out, keep it away from places where it will be exposed to steam or evaporating water (such as directly above the kitchen sink or stove). Hanging it in a dry place will also help the herbs dehydrate faster and hold their natural shape.
If you used the right herbs, your wreath will hold its form beautifully as it dries and you can keep it until the following year.
Or, you can make a herb wreath in the summer and remove the dried herbs for cooking at the end of summer, when you may want the frame for a harvest wreath or as part of the Christmas holiday home decor.
It doesn't matter how long you keep it, or if you decide to make a few and give them away as wonderful gifts.
As long as you don't squish or knock a dried herb wreath around, it will last for several years and will continue to bring rustic country charm wherever it is place in your home decor!


Homemade Herb Wreath
Equipment
- a natural wreath frame
- basket for gathering fresh herbs
- pruning shears
- fresh herbs
- cotton cooking twine
- optional: large needle for threading embellishments
Instructions
- Gather up a basket and pruning shears before heading out to the gardens.
- Cut handfuls of fresh herbs, taking at least 8 inches of stem with each bunch.
- Lay bunches in your basket, until you have 6-8 full cuttings.
- Bring your herbs indoors.
- Use your scissors to cut about a dozen, 10 inch long piece of cooking twine.
- Being tying herbs onto your natural wreath frame.
- Fill the entire frame or do a directional change partway to leave some of the frame exposed.
- Gather any embellishments you choose to use, and don't be afraid to use the needle and cooking twine to string them together!
- Tie embellishments to the wreath frame.
- Slip a piece of cotton cooking twine through the natural wreath frame and knot it closely for hanging loop.
- Display your herb wreath in a dry place where it will hold it's form and shape for a long, long time.

I really like the herb wreath. Natural, useful, aromatic and decorative. If you were closer, I'd have you make me one!