A Year's Review of the Mountain Cottage Gardens
As a homemaker who likes to grow nutritious food for the table, I always try to review my gardens in the new year so that I can record the little things, take note of the lessons I've learned and make observations for the upcoming garden season.
Because I know we're all missing our gardens this time of year, I thought it would be fun to bring you along as I do my review. I'll share helpful tidbits, show you pictures and let you see that I also have things that miserably flop (quite literally) in my gardens!
This past growing year was very successful and especially so, when I stop to consider that we created our primary vegetable garden just a few weeks before planting!
I always feel shocked when I remember that the oldest garden on our land (the kitchen garden) is no more than 2 1/2 years old at the time of this writing. For some reason, it feels like things have been here indefinitely, that we didn't have to sweat, shovel, haul rock, logs and dirt to create these growing spaces.
I'm delighted with them. Purely delighted! And here are my notes on the Mountain Farmstead gardens from this past year.
Observations on Early Seed Starting
Early in the spring, my man built a wooden, stacking shelf for seed starting our vegetables (it worked very well!). After hanging florescent lights, I sowed tomatoes, peppers, cabbages, broccoli, cauliflower, herbs and flowers. I started lettuce and kale as well, because I wanted to try planting them out early, underneath cold frames along the south-facing walls of our home.
The seed starting system worked well and I'm definitely going to use it again this spring.
Lessons I Learned
- You can save time by moistening soil before planting seeds
- Be sure to label your starts well (esp herbs and flowers) so you don't get types confused
- Set all your pots on pieces of plywood so you can easily pull them out for watering.
Observations on Using Cold Frames in Early Spring
In early spring and when self-sowed mountain spinach began to appear along the south/west-facing walls of our home, I took it upon myself to build cold frames for the cottage garden beds.

I transplanted my lettuce and kale seedlings into these garden beds and covered them with my homemade cold frames.
Lessons I Learned:
- Greens for my cold frames should only be seed started 2-3 weeks ahead of time.
- I won't be trying kale again, because it really didn't grow much faster than it would have without a cold frame
- Lettuce varieties with firm leaves did better than the delicate, frail types
- I want to try mustard greens and spinach next time.
Observations on the Kitchen Garden Beds
As expected, my hugelkultar raised beds settled over the winter and in early spring, I gave them a fresh application of soil and straw mulch!
It was a wet summer and the slugs were very active in these kitchen garden beds. I had to plant cucumbers 3x! More than once I wished our order of ducks had come through so they could have cleaned the little invaders out.
All year long, we continued to have mice living underneath the hugelkultars, but once again they didn't do any real damage to the seedlings, plants or fruit.

My kitchen gardens are still a work in progress, but I added more perennials this spring including oregano, thyme, lavender, echinacea, catnip, bee balm and mountain spinach. The sage and chamomile returned, which delighted my heart! That is what I want for these beds: both self-sowing and perennial herbs of all kinds!
Lessons I Learned
- If it's a wet year and slugs are a problem, it's a good idea to remove your mulch and even hand water for a time. If you don't have ducks, that is!
- It takes years to establish an old fashioned kitchen herb garden and you have to be patient with the plants and the process!
Observations on the Soil in the Primary Vegetable Garden
I can't believe we create the main vegetable garden only a few weeks before we planted! In spite of our rocky, sandy soil, our above the ground garden yielded a full, beautiful harvest and I'm totally sold on the method we used.
You know how I've always poo-poohed the soil we have on our land? The sand, gravel and rock that it is? I've had a complete change of attitude toward it this past year! Here's why: the garden beds we formed with a mixture of our soil and composted animal manure did better than any of the other garden beds created with the topsoil/composted manure we hauled in.
Really.

The plants were decidedly bigger, grew faster and were the healthiest in the entire garden! I couldn't believe it. I should have listened to gardeners in our area who told me not to underestimate our soil, even if it was rocky and a bit sandy!
A lesson on dirt? I need to use what we have here, because it apparently does make excellent growing soil when paired with some good, composted animal manure! And I also learned I need to listen to older, wiser gardeners.
Observations on Our Harvest from the Primary Vegetable Garden
The harvest from our primary vegetable garden was better than I expected. And since this was my first year growing a full garden on the Mountain Farmstead, I'm going to make note of each vegetable type, how they grew and if I need to change anything for next year.
And yes, I do grow an heirloom seed garden!
Red and Green Cabbages
I planted both "Late Flat Dutch" and "Mammoth Red Rock" cabbages for making winter sauerkraut. Both did well, though I did notice cabbages grown in our native soil did best. The bugs (mostly) left them alone and I had enough to do all the fermenting I wanted!
Lesson I Learned
- Grow next year's cabbages in beds with native soil.
- Try a variety that matures earlier in the year, so I have some for summer eating

The Potato Harvest
My potatoes did very well in beds that were made with our native topsoil. Everywhere else, they were a bit scabby. But the harvest was plentiful.
Lesson I Learned
- We need to grow both early potatoes and winter storage potatoes if we're going to keep them on the table year-round
- You shouldn't leave early potatoes (those that are supposed to be harvested mid-summer) in the ground until fall, or some will begin to split and rot from the inside.
- Stop watering them about a month or two before harvest (I think over watering also contributed to the interiors splitting)

Snap Beans for the Table
I was delighted with our bean harvest! For the first time ever, I actually grew pole beans, specifically a "Kentucky Wonder Brown." And I fell in love. They taste amazing, are easy to pick, were more frost resistant than my bush beans and looked just beautiful in the garden!
Lessons I Learned
- Pole beans need something vertical to climb and won't know where to go if you only have an 6 ft tall A-frame with 3-4 ladder-like rungs for them grow up.
- Make sure you have a trellis system in place before your beans need it or you'll delay their production.
- If harvesting bush beans gives you a sore back, grow pole beans instead!

Broccoli and Cauliflower
This year I tried planting "Early Snowball Cauliflower" and "Calabrese Broccoli." The sum of the parts is this...they flopped. It must be my soil because these past two years, I've never had good luck with either one. I seed started them early, so we could take advantage of the cold weather. I planted them out, watered them well and got next to nothing by way of a harvest.
Next year I may try planting a few in the berry patch, where there's more shade. But until I understand these two better, there's no sense wasting rows in the garden on something that doesn't yield a harvest!
Lesson I Learned: don't plant lots of something if you haven't had good luck growing it!

Pickling Cucumbers
I had a very difficult time getting my pickling cucumbers started because of the slugs and wetness. I went all-in and tried a new variety this past year...and promptly regretted it!
"Parisian Pickling Cucumbers" are meant to be harvested while very tiny and are used for making tiny, crunchy gherkins. My problem was this: harvesting cucumbers while very tiny meant I needed a lot more plants to get enough to run a canner full of dill pickles. And I didn't account for this change.
To make matters worse, this variety was covered in tiny, sharp spines that had to be removed before pickling. And when I let them grow to become a bit bigger, they became incredibly bitter.
Lesson I Learned:
- The grass isn't always greener on the other side and if you do try a new variety, just grow a few plants
- Next year, I'll just grow my favorite "Boston Pickling Cucumber."
- Taste test your cucumbers before preserving so you end up with bitter dill pickles!
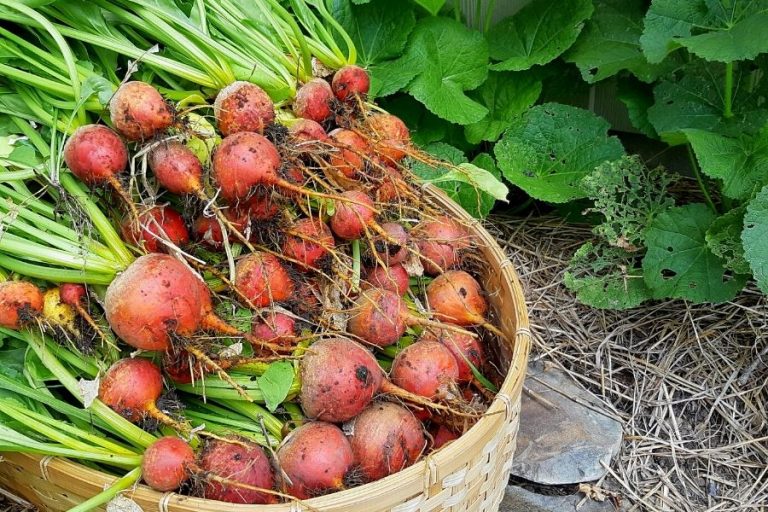
The Root Vegetables
Beets (Lutz Green Leaf and Golden Beet), carrots (Danvers Half Long) and parsnips (Hollow Crown) did very well and yielded a full harvest.
I had an epiphany while seeding carrots this past spring. As my man and I were sowing, I began telling him about how much I loved carrots but hated thinning them!
And he calmly suggested that if I would stop seeding my rows so heavily, I would have less thinning to do!
Novel idea!
Not only was I able to thin rows much faster this summer, but I had plenty of seed leftover for next year's garden!
Lesson I Learned:
Ask your husband to help you resolve life's problems more often...because he just might be able to!
I want more carrots next year because we are using up our winter supply rather quickly.

My Onion Harvest
This year I planted both onion sets (Yellow Spanish) and onion seeds (Australian Brown). The sets grew well and were beautiful, golden bulbs by the end of the garden season. But I need to double my numbers next year.
In the fall, I had to bend the tops over to speed the “finishing” process. I think they were watered too well in their latter days and as a result, refused to die off!
The "Australian Brown" seed I planted in hopes of starting my own onion sets? They grew to be about the size of a silver dollar (or slightly smaller). I pulled and left them to dry. Now they're sitting in a paper bag in my cold room. This upcoming garden year, I'll replant them and (hopefully) get full size Australian Brown onions!
I want to start my own onion sets every year from now on.
Lesson I Learned
Grow more onions.
It's not difficult to start your own onion sets, you just have to plan a year ahead!
Grow your onions on the outskirts of the garden so they receive less water

About Growing Garlic
Ahhh, yes. Give me all the garlics!
This past year, we grew "Russian Reds." They did well, considering I only planted them in early spring! But when fall planting time came 'round, I realized we didn't have enough to take us through an entire year.
So this past fall I planted more "Russian Reds" than before and also ordered in "Chesnok Reds," another hard neck variety of garlic.
The cloves are sitting snug in their garden beds under the snow as I write. And next year, I want to add a "Italian Softneck" to the collection. It's an excellent storage garlic, can be braided and is supposed to have a pungent, bold flavor!
Lessons I Learned:
Grow more garlic.
Plant a softneck variety next fall.

Tomatoes, Ground Cherries and Peppers
I grew most of my tomatoes (Amish Paste, Oplaka) along the south wall of our home again, with a few in the primary vegetable garden, alongside "Aunt Molly's Ground Cherry. I also grew some "Black Cherry" tomatoes in the hugelkultars and they all gave a full harvest.
The south wall of our home works well for tomatoes and I want to keep planting them there (unless of course, they get a disease).
In the vegetable garden, I think we had some contaminated, composted animal manure in a few of our beds. You know, from animals consuming hay that was sprayed with weed killer? The tomatoes planted in 2 of these rows did poorly, had curled leaves and looked like they were trying to shrivel up and die.
Research indicated that sprays were the culprit. And in light of this, I won't be planting tomatoes in these beds again. Not for several years, anyway!
My "Sweet Chocolate Peppers" did poorly. I won't be growing them (or any pepper) again unless I have a greenhouse or use my cold frames to give them the extra boost of heat that they need.
Lessons I Learned:
Keep doing what I've been doing with tomatoes.
- Ground cherries are a fun "side" crop and I'd like to see if I can create a bed of them that will self seed.
Be careful about where I source my composted animal manure.
My climate is cool enough that peppers can be hit-and-miss, so I need to grow types that are quick to mature and use a mini greenhouse.

The Sugar Pumpkins, Winter Squash and Zucchini
We had a full harvest of all 3 types this year!
Because we had limited space, I planted in the berry patch out back. In spite of the fact that this area gets less morning sun, they all did well. But I did have an issue with the butternut squash.
Early on, I noticed the seedlings had a white, powder-like coating. So I pulled out the best gardening book for home gardeners and discovered my squash had powdery mildew. The book said young plants that catch this particular type of mildew won't produce fruit for you even if they do survive.
But I wasn't 100% sure about my diagnosis, so I left the plants and they cleared up in a few days. But you know what? They never did give me any squash! Not a single butternut! I should have trusted my Rodale book!
And in the fall, I had a sad mishap. After harvesting all pumpkins, winter squashes and zucchinis, I put them all under cover in our wood shed. My man had projects happening in the mud room (where my squash were going to go), so I had to wait.
A few days after he finished his project, temperatures unexpectedly dipped below -10 C. And I lost all our winter squash and pumpkins!
Lessons I Learned
Trust my favorite “Rodale Organic Gardening Book” and pull plants that are diseased (especially when the book tells me they won't produce!)
About 4 zucchini plants and 4 spaghetti squash plants are enough for my man and I.
- I learned I like small winter squash varieties best, because they're easy to handle and will fit in a baking dish when halved.
Keep an eye on the winter temps when you have squash sitting in your woodshed and move them indoors asap.

The Cottage Garden Beds
Whew! Are you still with me? There's just one more garden bed I need to bring up!
And that would be the cottage garden beds (the ones tucked up against the house). I got a significant start with perennials this year and established bee balm, hollyhocks, lavender, echinacea, columbine.
Because I'd never grown either from seed before, I got my lavender and bee balm mixed up when planting. Fortunately you can always move herbs, even if it sets them back a bit!
My focus for next year is to firmly establish these beds with perennials and self-sowing flowers.
Lessons I Learned:
- Make sure you clearly label your herbs and flowers so you don't get them confused
- While self-seeding and spreading will happen over time, you'll feel like you've made more progress if you plant lots of something
- I still want to add more flowers (calendula, johnny jumps, chamomile, a rose bush) to my selection in these beds around the house!

Wrapping It All Up
There's more I could tell you. About the Strawberry Rhubarb we put in the berry patch. The berries we're growing. About drip watering. Asparagus crowns I ordered in and planted. David Austen roses and how we need to move the raspberries that are just off the kitchen because the deer won't leave them alone.
But that's enough for today, because I do believe I've exhausted your reading energy with this very lengthy post on my reflections about this past year's garden!
I really do think that growing your own food is one of the best ways a woman can look after her family, home and self. Can you tell?


Love your blog I live in Texas East, and just started my seeds today are weather here is warmer and I have raised beds so waiting to plant outside also. Its my first year trying a raised bed garden and have set aside my whole east side for my English garden with other things to grown in raised plants so maybe my tomatoes will go there. Brought the book you suggested and will use it for planting now working on getting the soil right and making a path with stones already have figs trees in that area on the side of the retaining wall so I can stand on it to pick the figs. Love where I am and have plenty of land just too much to make into gardens.