Pine Cone Ornaments for the Cottage Christmas Tree
In this tutorial, you'll learn how to make pine cone ornaments for the cottage Christmas tree! This simple Christmas decor project is family friendly from start to finish. And better yet, it'll last for years to come.
So often, Christmas tree ornaments are fragile and breakable. While colorful glass balls are beautiful to look at, we all know they shatter into a million pieces when they hit the hard floor. Sometimes they even break in storage!
And while natural Christmas tree ornaments don't have the same gloss and sheen, they are beautiful in their own way. If you're anything like me, you enjoy decorating your home with natural things around you. Like tree cones.

Best Tree Cones to Use for This Project
When it comes to making pine cone ornaments for the cottage Christmas tree, some tree cone varieties are large and will need a sturdy branch to hold them up, while others are smaller and may be better suited to hang on your tree.
Here are the primary 4 conifer tree families that produce cones suitable for cottage Christmas tree ornaments.
- Fir
- Larch
- Pine
- Spruce
How to Collect Your Own Tree Cones
While I give you links to sourcing the 4 tree cones types below, I'd encourage you to try finding your own in the great outdoors! It might not be a difficult as you think and can be turned into a fun, family outing. Here's how to collect tree cones for Christmas tree ornaments.
- Grab a bag or two for collecting cones.
- Take a walk (or drive) through a forested area, keeping your eyes high in the trees.
- Cones often grow in groupings on branches and should be relatively easy to spot.
- Check the ground underneath the tree and collect both "open" and tightly closed tree cones.
- Upon arriving home, spread newspaper (in case cones drip sap) out on a flat surface in a warm location.
- Set both open and "closed" cones out in an even layer.
- Open cones will dry quickly and can likely be used in a day or two.
- Closed cones will need about a week to fully open and dry out; be watchful for any sticky sap they might release.
How to Make Pine Cone Ornaments for the Cottage Christmas Tree
Whether you buy cones or collect them from the forest around you, making these natural Christmas tree ornaments is something that everyone can participate in. But first, let me give you a short list of things you'll need.

List of Things You'll Need
- conifer cones suitable for your tree
- dark blue ribbon
- lace ribbon
- cotton string
- scissors
Watch the Tutorial for Directions!
Tips for Making Pine Cone Ornaments
- If foraging for your cones, be sure to let closed ones fully dry before using them for this project! Sap can be messy to deal with.
- Before you making tree cone ornaments, try hanging various cones sizes from the Christmas tree and see which ones best suit the strength of your branches.
- While I love having blues, cranberry reds, white and silver for Christmas colors, be sure to choose ribbon colors that suit your color scheme!
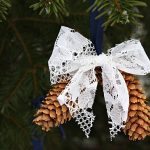
Pine Cone Christmas Tree Ornament
Instructions
- Gather (or purchase) pine cones.
- If using freshly harvested cones, be sure to set them in a warm place for 7 days, both to dry and fully open up.
- Cut a 6 inch piece of cotton string.
- Tie one end of the string around the top of your first cone, being sure to slip it between the scales so it isn't noticeably visible.
- Place your second cone next to the first and tightly tie it around the top with string as well.
- Trim off loose ends of cotton string.
- Cut blue ribbon to length, then slip it between the two cones, looping around the cotton string.
- Pull the ends up and tie in a knot or bow.
- Cut your lace ribbon to length and form a bow around the blue ribbon, just above the tree cones.
- Trim tails at an angle and adjust bow as needed.


Hi Autumn:
I love your pine cone Christmas Tree Ornaments. They're very beautiful, easy to make even for children and inexpensive.
I'm so glad you like them! I think they're pretty too. 🙂