DIY Christmas Garland With Orange Slices and Nuts
When it comes to Christmas and the holidays, I'm all about decorating with items that bring a festive, old world feel to my home. My style is simple and has a definite country vibe to it. And I love, love, love it!
In this post, I want to show you how to create a DIY Christmas garland with orange slices and nuts. Once finished, your garland will look beautiful hanging in a window or doorway. You can even string it around the Christmas tree!
If simple and natural Christmas decor speaks to you, you'll love this project!
How to Make a Christmas Garland With Oranges and Nuts
In this tutorial, I use nuts and dried orange slices to make my garland. But you can use different types of dried fruit, popcorn, cinnamon sticks, Christmas tree ornaments, brass bells or anything else that appeals to your sense of beauty and style.
Ready? Let's do this!

Step 1: Source Your Items
Before you start making your garland, you need to decide exactly what you're going to display on it! For this particular project, you'll need a roll of jute twine, 2-3 oranges (get real oranges, the skin is too loose on mandarins) and a package of nuts still in the shell (walnut, hazelnut, almond, etc).
Because the food items are for decorative purposes only, I usually buy the cheapest options I can find!
Step 2: Slice and Dehydrate Your Oranges
Oranges need to be dried before you put them to use. It's not hard! Leaving the peel on, slice each orange into 1/4 inch rings. Spread them out on your dehydrator trays, turn the dehydrator on and let them go until the peels and juicy centers are dry.
You can also dehydrate orange slices in the oven. After cutting them into 1/4 inch rings, spread your slices out on a baking pan or stainless steel cooling rack. Turn the oven on as low as it'll go and leave the slices to dry. The process will probably take 3-4 hours in total.
Step 3: Drill Holes in Your Nuts
While the oranges are drying, find yourself a short piece of lumber, a drill and a 1/8" drill bit. Set your board on the dining room table, place your nuts on the board and begin drilling holes through each one.
Be sure to watch your fingers! Drilling is safer if you have a good, sharp drill bit. It goes faster too. And don't worry if you break a few nuts in the process. It happens!
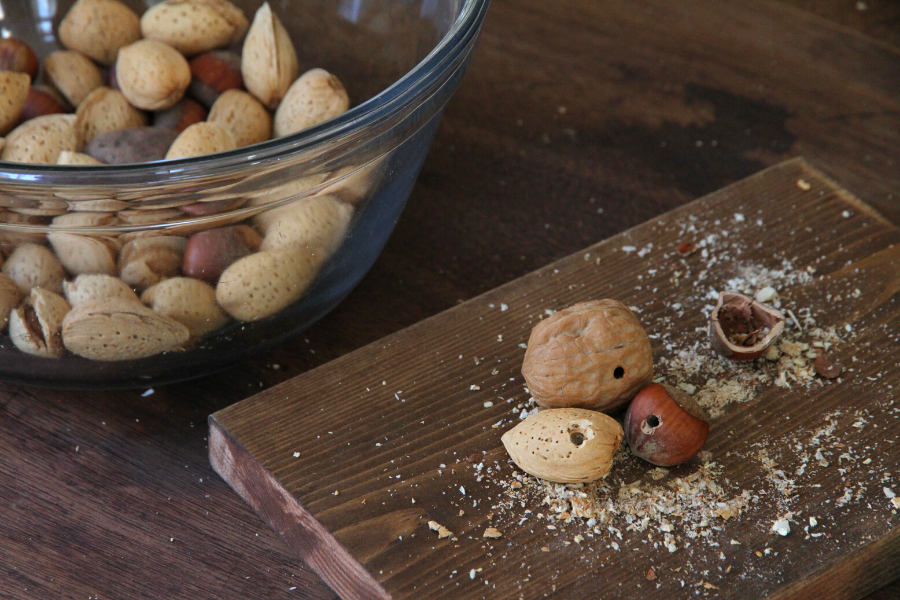
The drilling process does take time, but once your holes are drilled, you can use the nuts year after year. I think it's a fair exchange!
Step 4: Cut Jute Twine to the Desired Length
Once the nuts are prepared, go measure the width of the window or door you want to hang your garland in. Cut your jute twine to the proper length, remembering to account for a bit of swag and tie-off knots on each end.
Step 5: Cool and Prepare Orange Slices
When your orange slices are ready, remove them from the oven or dehydrator and let them cool for 5 minutes. Using a large darning needle, poke holes through the rings just below the dried peel.
You can don't have to hang orange slices individually. Sometimes I like to create a cluster by tying rings to one another and using them as the center point of my garland.

Step 6: Stringing Your Garland
There are two different ways to string your garland. If you want a full, luscious look, you should add one item after another, without any spacing in-between. While full garlands look amazing, they tend to be quite heavy and use lots of nuts and oranges!
In this tutorial, I knotted my jute twine between each addition to help spread things out. And I used far less items than I would have with a full stringer!

Add items of your choosing, until you're happy with the end result. And then? It's time to prepare your garland/stringer for display!
Step 7: Hang Your Garland
Form knotted loops on each end of the jute twine. Then make sure you have something to hang your garland from. You may need to pound tiny nails or even add small hooks to the frame of your window or doorway.
This accomplished, hang your garland and enjoy!

If you find your garland is too sparse, that you don't like the items you chose or if you want to add something different, you can always pull it down and re-string. Play with it. Add and take away until you get the results you want!
And that? That's how you create a DIY Christmas garland with orange slices and nuts...or whatever else you prefer to use! Let me know what your favorite items are in the comments below!