How Do You Package Meat?
Have you ever wanted to learn how to package your own meat? I think it's a wonderful skill to have! It's another things you can DIY that will save you a significant amount of money as the years go by.
Traditionally, butchering day was a family affair. The men would do the slaughtering, while the women busily worked in the kitchen, dividing up and setting aside fat, organ meat and preparing things for winter storage.
How to Package Your Own Meat
While you might not raise and butcher your own meat, you can learn to package it at home! It's simple. And in this blog post, I'm going to show you how, step by step!
Step 1: Source Your Supplies
To package meat at home, you'll need a roll of butcher paper, a roll of white masking tape, scissors and a marker. Also make sure you have space in the freezer! On average, 75-80 lbs of red meat will take 2 cubic feet of space.
Got it?

Step 2: Take Time to Set Up
Before you handle raw meat, take time to prepare for the wrapping and packaging process! There are two things I recommend for a smooth operation.
#1: Cut Butcher Paper to Size
Butcher paper comes in large rolls (here's the type we use) and just like wrapping a gift, you'll have to pre-cut the paper with scissors. If you have trouble getting a straight line, use the edge of a counter or table as your guide.

How do you know which size is the right size? It all depends on how much meat you want in each package! For a 1 lb package of stew meat or burger, I recommend starting with (roughly) a 20x20 inch square.
Of course, if you're wrapping large roasts, you'll need larger pieces of paper. It's not hard to figure out. Play with it and you'll quickly catch on!
#2: Cut Freezer Tape to Length
Always cut freezer tape to length (we like this type) before handling raw meat! Once moistened, tape won't stick well to butcher paper...or anything else! Cut (or tear) tape into 2 inch lengths, sticking each piece on the top edge of your meat-wrapping table. Here, they're easy to grab and your messy fingers only have to touch them once.
As we were packaging meat this fall, I realized we forgot to replenish our tape supply after last year's butchering! Because we've been building our own home, we had lots of FrogTape (a multi-surface painter's tape) on hand. It worked well!
How Do You Package Meat?
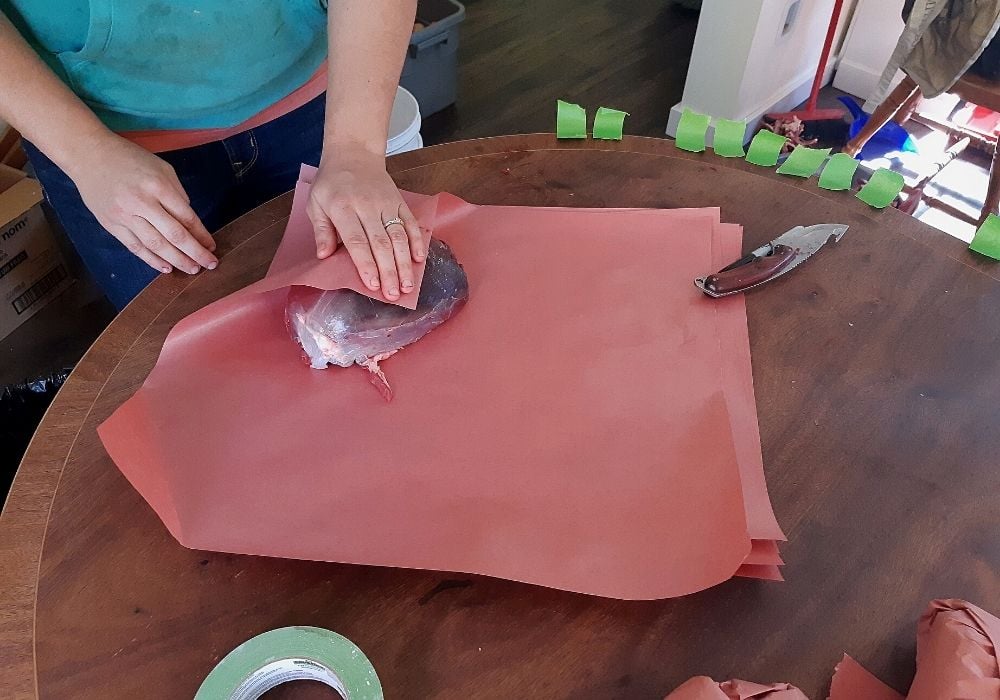
With these two tasks out of the way, it's time to wrap your meat! Before you begin, make sure the stack of pre-cut butcher paper is wax-size up. Turn the stack, so it looks like a diamond, instead of a square.
Step 1: Start With A Corner
Place the meat in the corner closest to you, then fold the tip of the paper over, on top of the meat. Then give the meat a half roll, so the portion that was face up is now face down.
Step 2: Fold the Sides In
The meat should be hidden (or mostly hidden) by paper. Now take the right side, fold it over on top of the package, pulling it tight. If the paper point sticks out past the package, simply fold it under itself.
Do the same with the left side. Much like an envelope, the top of the package is now the only open part.

Step 3: Roll and Tape
To seal the top, keep rolling the package over, until all the paper is wrapped around the meat.

Take a piece of tape and fasten the free end into place. Like this.

That's it! You just learned how to wrap your own meat! But wait. There's still something you need to do.
Step 4: Label Your Package
Before putting your meat in the freezer, be sure to label it! You should include the type of meat (pork, beef, deer), the cut (is it a roast, steak, burger?) and also, the date.

That's it! Now you know how to package your own meat! This is my favorite method because it's quick, clean and holds up well in the freezer.
Do you find freezer burn happens more often than not by not having some sort of plastic type wrap? I hate the idea of plastic directly on the meat but also worry about losing meat to freezer burn.
Freezer paper is actually lined with a very thin sheet of plastic. We always use our meat up in a year's time, and have never had any problems with freezer burn. But if you're hoping for 2 year storage, I would wrap it in plastic first. You can use a roll of plastic wrap, or thick, ziplock freezer bags do a good job too.