Garlic Sausage Recipe with Deer Venison and Pork
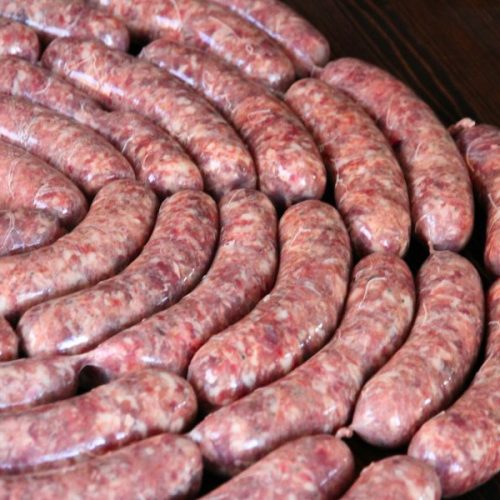
Make this fresh garlic sausage recipe using ground venison meat and pork. Loaded with fresh garlic, this tasty homemade venison sausage recipe will keep the freezer for 4-5 months and can be cooked from frozen for a fast and easy meal!

Nearly every year, my man hunts and harvests venison during deer season. Sometimes, I buy my own tag and join him. And regardless of who gets the deer around here, we usually have a freezer full of venison by the end of fall.
With a meat supply laid up, we usually get the itch to experiment. I won't tell you exactly how it's all gone down, but our attempts at dry curing deer meat, making deer belly bacon and also homemade venison sausage haven't always had glorious endings.
Ehem.
And over the years, we've tried numerous venison sausage recipes. Whether we follow a tutorial or make up our own ingredient list, we've never been 100% happy with the results. Deer meat is lean.
Lean, folks!
So this year, we decided to try mixing it half 'n half with our home raised pork. It was delicious, even if I thought it was a bit too light on venison flavor.
What can I say? I love bold flavors. And deer meat is one that I love!
Next year, we'll try changing this exact recipe to 2/3 venison and 1/3 pork, instead of a 50/50 ratio. With less fat content to mellow the flavor, and I think it will be about perfect!
As it currently stand, this garlic sausage recipe with deer venison and pork is mild and delicious. It's something I would confidently serve to someone who wasn't a huge fan of deer meat.
The Difference Between Fresh Venison Sausage (this recipe) and Summer Sausage
Before we get too deep into this tutorial, let me make it quite clear that this is a fresh sausage recipe, not a summer sausage (aka dry sausage) recipe.
Summer sausage has curing salt added to the mix and needs to be cold smoked or dry cured to make it stable.
This fresh sausage recipe consists of raw meat, fresh or dried herbs and salt for flavoring. To preserve it, you can refrigerate it short term or freeze for long keeping.
Tools You'll Need
The challenge with making homemade sausage is always the cost of the meat grinder.
It isn't cheap and while you can find manual meat grinders at a decent price, they're a lot of work to run. And then you also need the sausage stuffer attachments.

To keep the cost down, several families in our community pooled money together and bought a very nice electric LEM meat grinder. Considering that you really only use a meat grinder 1-2x per year, it was totally worth it. 🙂
Here's a list of tools you'll need.
- natural hog casings
- meat grinder with sausage stuffer attachment (we use this one HERE)
- 2 large bowls for vension and deer (we use these 13 quart bowls)
- kitchen scale for measuring herbs and salt
- butcher paper and/or vacuum seal
- scissors
- freezer tape
While you can use collagen casings for making garlic deer sausage, this tutorial focuses on using natural hog casings. I prefer them because natural casings are stronger than man-made casings, plus they're thinner and easier to chew.
Special tip: be aware that you treat collagen casings differently than you do natural hog casings. In this tutorial, I focus on hog casings only.
List of Ingredients
- 10 pounds of pork
- 10 pounds of deer venison
- 25-30 large cloves of fresh garlic
- salt
- black pepper
- oregano
- curry
- paprika
If you don't have fresh garlic on hand, you can use garlic powder. But try and use fresh garlic if you can. We're garlic growers around here and you just get better flavor with fresh, home grown cloves!
How to Make Garlic Venison Sausage
To make your own sausage, you need to start with fresh meat. Quality meat that has been frozen and thawed works too.
If you don't raise your own meat (aka hogs), try buying from a local butcher or farmer. Pork shoulder or other tough cuts of meat can be cheaper and will make great sausage. Of course, you'll need fresh venison meat as well!
When you set up your LEM meat grinder to pre-grind your meat, be sure to use the 4mm plate (it has the largest holes). You want your ground meat to be chunky! Send both the pork and deer meat through the grinder, catching it in a large bowl below.
Only do this 1x, so you don't break the meat down too much. Otherwise you'll get pasty sausages without much texture.
Helpful tip: if you plan to stuff sausages the next day, just run chunks of pork fat through the grinder until all the meat is removed. Let it sit overnight and push more fat through before you use it again the next day. We learned this tip from co-owners of the meat grinder!
Season your meat and mix in fresh garlic, herbs and spices. Cover and let it chill for 8-12 hours. This gives time for salt and spices to permeate throughout.
The next day, you'll need to soak your natural hog casings for 1-2 hours before using. This removes the salt and increases elasticity.
Fit your LEM meat grinder with the stuffing plate, followed by the 1 inch sausage stuffer attachment. Slip a length of hog casing on the stuffer until it's nearly full. Twist or tie off the end of your casing and shove it tight to the opening of the stuffer.
Slowly and evenly add meat to the grinder while gently moving the casing along with your other hand. I can't do this part by myself yet. My man and I always tag team it. One feeds the machine while the other guides the filled casing. Waaaaay easier than doing it by yourself!

The trick is to fill the casings without overfilling them. Remember, you still have to twist and pinch off sausage links!
Fill long pieces of casing and then it's time to make links.
Form sausage links by pinching your filled casing every place you want another sausage. Twist in the opposite direction of the previous link to hold things in place. If you plan to cut links before cooking, be sure to do 6-8 twists for each one.

Use scissors to snip individual links or groups. Package them in meat paper. Label, date and freeze up to 6 months.
This recipe will make 20 pounds of garlic deer sausage.
How to Cook Deer Sausage
This homemade deer sausage recipe with pork and garlic can be baked long and slow in the oven. Or you can pop it into a frying pan with some lard and fry it for 5-7 minutes on each side.
Remember, this sausage contains pork, so it needs to be cooked throughout. When the inside is no longer pink, it's safe to eat.
Pin this for later:

Can I Use Other Wild Game Meats as a Substitute for Deer?
Yes, you can. Feel free to use other wild game meats in the place of deer. Just be aware that the flavor will change according to the type of wild meat used!
Is it ok to smoke fresh garlic sausage?
I love smoked hams, smoked sausage, smoked fish or jerky. So delicious! And I'm happy to tell you that yes, you can smoke this garlic venison sausage, provided you hot smoke it.
Hot smoking cooks the sausage throughout as it leaves a smokey flavor behind. If you want to hot smoke this recipe before eating or freezing it, feel free! It should be perfectly safe.
But don't try cold smoking it. Cold smoking is only suitable for summer sausages or dry sausages that contain curing salt. This recipe doesn't, so it isn't safe for cold smoking.
Garlic Sausage Recipe with Venison and Pork
Equipment
- natural hog casings
- LEM meat grinder with sausage attachment
- two 14 quart bowls
- kitchen scale
- butcher paper
- freezer tape
Ingredients
- 10 pounds ground venison
- 10 pounds ground pork
- 25-30 garlic cloves pressed or finely minced
- 6 ounces salt
- 3 ounces oregano
- 1 ounce black pepper
- 1 tablespoon curry powder
- 2 tablespoons paprika powder
Instructions
- Send both deer and pork meat through the grinder.
- Peel garlic and send it through a garlic press.
- Use hands to mix fresh garlic, salt, herbs and spices in with ground meat.
- Cover and refrigerate for 8-12 hours.
- Soak hog casings for 1-2 hours before using.
- Set up your meat grinder with sausage stuffer.
- Pushing casings onto sausage stuffer until the tube is 3/4 full, then cut casing.
- Send ground meat through the sausage stuffer, until it just appears at the end of the stuffer.
- Stop machine and knot the end of the casing.
- Carry on, feeding the machine and helping sausage casing along.
- Stop when casing is used up.
- Knot the end of casing and start forming sausages, pinching and twisting filled casing in opposite directions for each new link.
- Use scissors to cut links into individual sausages or lengths.
- Wrap in butcher paper, tape, label and freeze up to 6 months.


Hello! Do you use fresh oregano, dried or powdered?
I used crushed and dried leaves, like you would get at the grocery store!
There is no garlic in your recipe!
Hey Kenneth! How did I miss that? Thanks for pointing it out. All fixed!